Cake and Bake Show Manchester 2013

So this weekend I went to the Cake and Bake show in Manchester and it was brilliant! Free testers at every stand, amazing sugar craft, masses of different baking equipment, celebrity speakers etc. The main thing I got from the show was inspiration – all the different kind of cakes, pastries, breads, pies etc. were wonderful and they all looked yummy! It’s given me ideas for what kind of baking I want to do in the future and how it can be presented (it wasn’t a very good day for my healthy eating programme!)

I attended a ‘Perfect Piping’ masterclass with Harpeet Baura who owns Crumbs Couture in London – It was really informative and she explained the techniques of piping really well. I took a lot away from that class and if you do go to the Cake and Bake Show then attend this class, it was only £5 which seems nothing compared to how much I’ve personally taken out of it. One thing I will share that she told us about is how to get your buttercream ‘Brilliant White’ and that was to add a TINY drop of blue food colouring as this takes the yellow tint off the buttercream from the butter and makes it perfectly white.

If you do get a chance to go to the Cake and Bake show then I would definitely recommend it! It’s made me think about the path I want to go down in life and it definitely involves baking!

Here’s some pictures from the show – Some of the creations were incredible, my favourite is the Cookie Monster Cupcake 🙂

Wedding Dress Cake!

Wedding Dress Cake!

What more could a girl want?!

Jimmy Choo Cupcakes – What more could a girl want?!

Beautiful decoration work

Cookie Monster Cupcake

Cookie Monster Cupcake – OM NOM NOM!

Ruffle Wedding Cake

Ruffle Wedding Cake

Hannah xx

Easter Baking

Well it’s been another weekend of baking for me,

As far as I’m concerned  a bank holiday weekend is designed for one thing and one thing only, BAKING! This weekend I’ve made chocolate brownies, lemon drizzle cake, a Victoria sponge and I’ve tackled bread too, with a first attempt at Hot Cross Buns.

We’ll start with the chocolate brownies – I’ve made these several times and they are simply divine, fudgey, indulgent, chocolatey, just yummy! But the ingredients aren’t cheap to buy so I like to make them every now and then as a luxury and what’s better than a chocolatey brownie on Easter! You can find the recipe on BBC Good Food under ‘Best-ever Brownies’ (and trust me they are!) by Orlando Murrin. (the method to make the brownies is very well explained online, much better than I could do)

The lemon drizzle cake and Victoria sponge are family favourites that I think are great cakes to bake if you’ve never baked before, a Victoria sponge was the first cake I ever baked with my grandma when I was very small and it’s classic that everyone loves.  Again, you can find the recipes and methods to bake these cakes online. For my Victoria sponge, I usually cream the butter and sugar together first, then add the eggs, mixing after each addition and I add a spoonful of the sieved flour with the last egg as this stops the mixture curdling. When all the ingredients are properly mixed in, stop mixing  otherwise you’ll knock all the air out and instead of having a light fluffy cake, you’ll have a heavy dense cake that might collapse in the oven (and no one wants that now!)

Now to my Hot Cross Buns! As I mentioned above, this was my first attempt at making bread and I thought, well seen as though it’s Easter why not have a bash at these spring time favourites?! I got the ‘richly Fruited Hot Cross Buns’ recipe from the ‘Good Food Cookbook’ which seemed the simplest recipe I could find, I did watch the Great British Bake off Easter Masterclass and saw the ones that Paul Hollywood made but I wanted to stick with a simple recipe that didn’t need an endless list of ingredients. The book includes step by step pictures of what to do with your dough at each stage (kneading, adding the fruit, shaping etc) I managed to make 13 buns out of the recipe and they can be frozen. The recipe and method is as follows:

  • 500g Strong White Bread Flour
  • 7g Fast Action Yeast
  • Pinch of salt
  • 50g Caster Sugar
  • 1 tbsp Mixed Spice
  • 85g Butter (Unsalted)
  • 250ml Milk
  • 1 beaten egg
  • 250g mixed fruit (try and get some with the peel in too)

To Decorate

  • 50g plain flour
  • 2 tbsp golden syrup
  1. To start with, add your bread flour to a bowl and add your yeast at one side of the bowl and your salt at the other side. Add your sugar and briefly mix together.
  2. Melt your butter in a pan and add the milk when the butter is all melted. Make a well in the bottom of your bowl of flour mixture.
  3. Pour in your butter and milk mixture and then add the egg.
  4. Mix together with a wooden spoon until it’s well combined and mixed and then bring it all together with your hands (it will be quite sticky)
  5. Flour your worktop and begin to knead the dough (I seemed to have created my own kneading method that worked well enough)
  6. After about 5 minutes of kneading to dough should be nice and smooth – this means it’s ready for the first lot of proving. Put the dough in an oiled bowl and leave in a warm place for between 30 mins and 1 hour, now my kitchen doesn’t have a ‘warm place’ so it took about an hour for the dough to double in size.
  7. Remove the dough from the bowl and knock out the air by pushing down on the dough with your fingers  and shape into a large rectangle. Add the mixed fruit across the dough and then begin to knead again, making sure that there is an even distribution of fruit. Now you start to shape the buns, divide the dough into 12 pieces (which is about 85-90g per bun) and shape them, pinching the bottom of the dough together so they are nice and smooth.
  8. Place the buns on the baking tray about 2-3cm apart and leave to prove again for about 30mins until they have grown again and they feel ‘pillowy’ when you touch them.
  9. Heat the oven to 190c (fan oven) and mix together your plain flour with water until its suitable to pipe across your buns. When you’ve piped them, put them in the over for about 15 minutes until they look nice and golden brown
  10. Heat up the golden syrup until it becomes runny and then brush generously over the buns making them shiny and glossy.
  11. Leave to cool down fully and then tuck in!

The verdict – they were delicious! the spices and the fruit were just right and the bread dough wasn’t heavy (which can happen easily, and I was expecting it!) My only issue was that they don’t keep very well, After 2 days they were quite stale and dry, but perfectly fine toasted!

Here’s my attempt –

My first attempt and some bread making - Looking nice and golden. A Triumph!

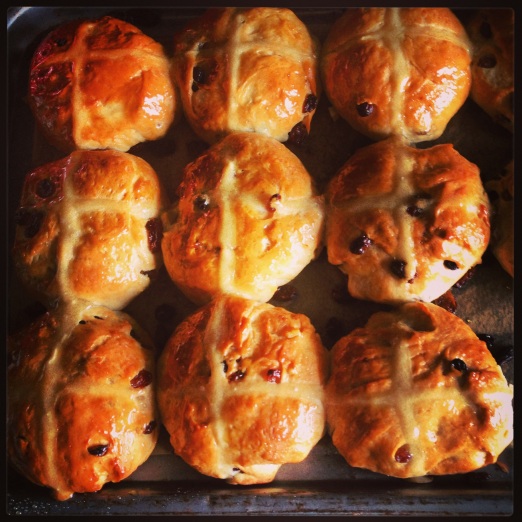
My first attempt and some bread making – Looking nice and golden. A Triumph!

Let me know how you get on!

Happy Baking!

Hannah xx

A first attempt at piping..

20130325-161538.jpg

Above you can see my first attempt at piping. Piping has always been the bane of my baking abilities, with each failed attempt getting worse and worse along with the mockery from my family (who are always completely honest) but I didn’t give up! I decided to try out some Tala Piping Squeeze bottles from Sainsbury’s, you can get 3 in a pack with different nozzles and they’re inexpensive. Although they were testing my patience at first (they seem to follow all the laws for gravity and got stuck at the bottom of the bottle) I finally got the hang of it and I don’t think they look too shabby, I’m aware they are no piping masterpiece but you’ve got to start somewhere, right? I’m going to the ‘Cake and Bake Show’ in Manchester next weekend courtesy of my wonderful boyfriend and I’ve book to attend a class on ‘Perfect Piping’ which I hope will improve my piping skills even more. If you were like me and the thought of piping brought you out in cold sweats, just keep trying and if all else fails you can tell everyone a younger sibling / cousin / nephew / niece / son / daughter did them, I won’t tell if you don’t!

The biscuits are ‘Iced Lemon Biscuits’ from The Great British Bake Off: How to Bake.

150g Unsalted butter, softened
100g caster sugar
Zest and Juice of 1 lemon
75g Cream cheese (I used full fat)
300g Plain Flour
Good Pinch of Salt and Baking Powder

100g Icing sugar

  1. Beat the butter until creamy, and then add the sugar and lemon zest then beat thoroughly until light and creamy (I used an electric whisk)
  2. Beat in 2 teaspoons of lemon Juice and leave the rest for the icing later, then beat in the cream cheese
  3. Sift the flour, salt and baking powder into the bowl and mix with a spoon or use your hands, I began with the spoon and then used my hands to combine the dough together
  4. Shape the dough into a thick disk, cover in clingfilm (I had to use a plastic bag which worked fine, we never seem to have any clingfilm!) for about 30 minutes
  5. Preheat the oven to 180 c / 350 f / gas 4
  6. Unwrap the dough and roll out on a lightly floured worktop using a rolling pin until its just slightly thicker than a £1 coin
  7. Dip a pastry cutter in some flour and then cut your shapes out from the dough (I used some star shaped ones and managed to get about 30 biscuits from the dough)
  8. Bake for 12 – 15 mins or until the edges are just turning golden brown
  9. Leave the biscuits on the tray for about 3-5 minutes to firm up and then transfer to a cooling rack and leave to cool completely
  10. To make the icing mix 100g on icing sugar with 2/3 teaspoons of the remaining lemon juice (I actually found there was a lot of icing left over so you might want to half the quantities)
  11. Decorate your biscuits, if you aren’t quite up to piping yet then spreading on the biscuits would be just as good
  12. Enjoy!

The biscuits will keep for up to 5 days (but they didn’t last 5 hours in our house!)

Hannah xx

Here Goes…

Well, after many, MANY months pouring over baking blogs, programmes, books, etc. I have finally bitten the bullet and decided to create my own blog…

I’m an amateur baker on a mission to spread all things baked as far as I can, at the minute it’s only close family that have to endure my many baking ventures, which are mostly successful. (some not so much)

As I write this, I’m devouring my final ‘Doughnut Muffin’ which are particular favourite in my house, I hope to expand both my repertoire and my abilities as an amateur and share my journey with you.

I hope you will enjoy reading my posts as much as I enjoy baking and sharing my creations with everyone, I will be honest and I will try and answer the inevitable ‘Why didn’t it work properly?!’ and ‘It looks nothing like the picture!!’ questions that not only I will learn from, but hopefully, you too.

Well, here goes!

Hannah xx